User Instructions
These are the the instructions for the latest firmware release, you may be using an older version of the DiscoX software on your device. To update to the latest version follow these instructions.
Table of contents
Buttons
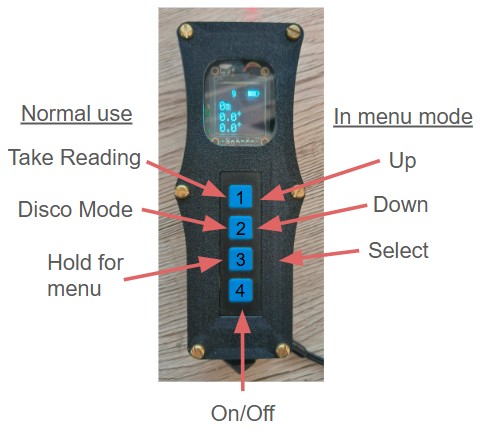
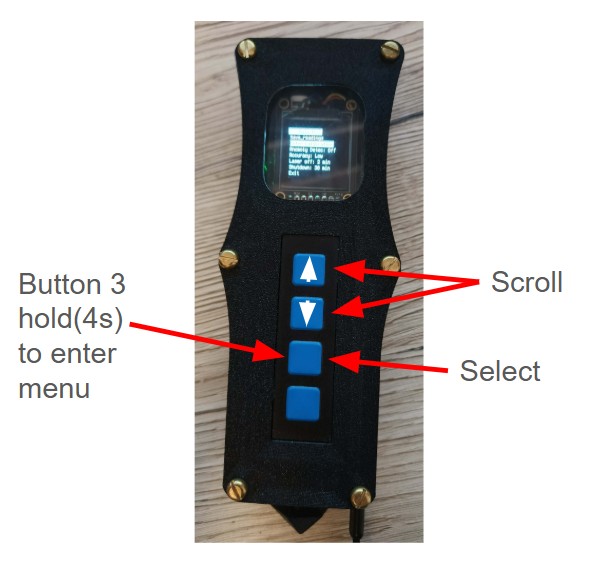
The DiscoX has four buttons, labeled 1–4 in the image below. Pressing 1 takes a reading, 2 activates Disco mode, and holding 3 opens the settings menu. Button 4 turns the device on/off.
In menu mode, buttons 1–3 have different functions: 1 moves up the menu, 2 moves down, and 3 selects an item.
Taking readings
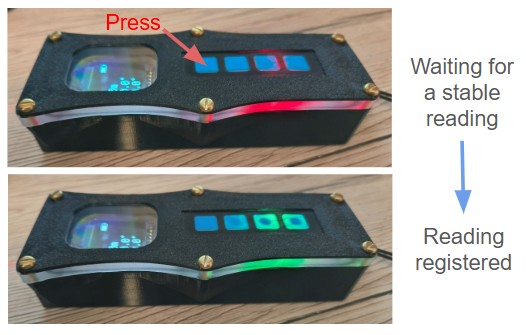
To take a reading, press and hold button 1, or press it for longer than 100 ms (shorter presses are ignored). After you press the button, the DiscoX stays red until it detects the device is stable. Once stable, it turns green and records the reading.
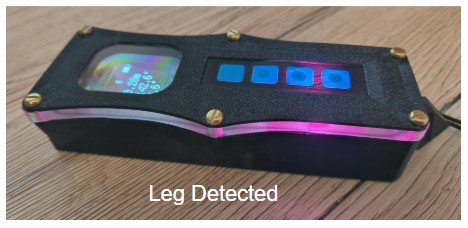
The DiscoX includes a leg-detection algorithm that triggers when it gets three consecutive readings where the compass, clino, and magnetometer values all fall within a set tolerance. When a leg is detected, the DiscoX flashes and beeps 3 times then turns purple.
Display
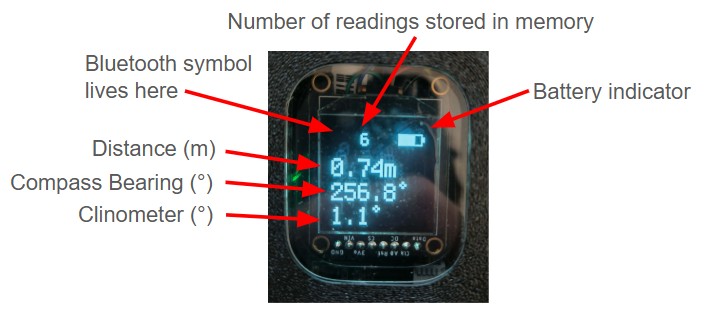
The display shows the data from your most recent reading. When Bluetooth is disconnected, readings are stored in memory. The count of stored readings appears next to the battery icon at the top of the screen.
Blutooth & memory
The DiscoX works with current versions of SexyTopo and TopoDroid. It’s always advertising over Bluetooth, so nearby devices will pick it up. Once connected, a BT icon appears in the top-left of the screen and you will be able to send live readings to your phone. If stored readings are present, the device will transmit them to your phone after connecting; this can take a few seconds, longer if many readings are queued. DO NOT turn the DiscoX off during this period or your readings will be lost.
Feature request: In future versions of the software I’ll make it so you can save the latest 10 reading backup files to memory so you can retrive them if you run into connectivity/upload issues.
Your DiscoX will come with a unique name e.g. DiscoX_Sasquatch, this name can only be changed by opening the case and programming the Bluetooth module directly. If you name a specific name in mind let me know and I can name it before assebling one.
Settings
There are two ways to change the DiscoX settings: using the onboard menu, or editing a more comprehnsive settings.toml file after connecting the device to your PC.
To enter the onboard menu press and hold button 3.
Anomoly detection
This checks for magnetic anomoies, e.g. putting the device too close to your helmet light, watch, srt kit or bolt. Sometimes gives false readings so can be turned off.
Accuracy
In the current software, sensor noise is reduced by averaging multiple readings. With a higher accuracy setting, the device averages more readings before recording a shot. This can make taking shots slower, but it improves the accuracy of your survey.
Laser off
Keeping the laser on for long periods can damage it and drain the battery. To prevent this, you can set it to turn off automatically after a specified time.
Shutdown
This sets how long the device will remain idle before automatically turning off.
Exit
Returns you to the main screen where you can resume your readings
Calibration
Calibration should be performed whenever you survey in a new area or if you suspect your readings are inaccurate. It’s recommended to keep a set of base stations near your home or survey site to quickly verify your DistoX readings before each trip. To calibrate, enter the menu and select “Enter calibration mode”, then choose either ellipsoid calibration or alignment calibration.
Ellipsoid calibration
Calibrating the DiscoX is similar to calibrating a DistoX and requires 56 readings (14 sets of 4 readings).
In each set, the 4 readings are taken from the pointed tip at the back of the DiscoX to a single fixed point.
Rotate the DiscoX (“barrel-roll”) so the screen points up, right, down, and left for each reading in the set.
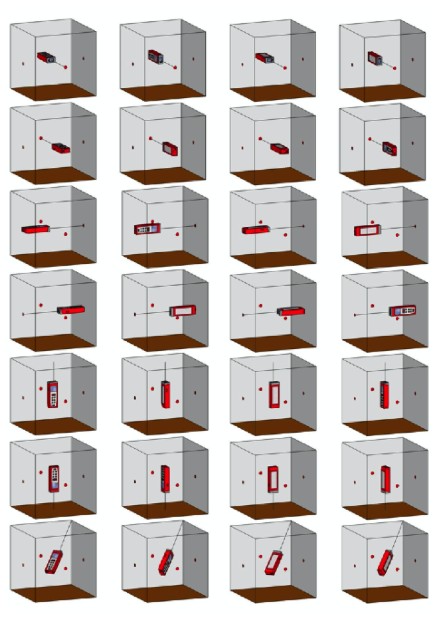
Spread the 14 fixed points widely. One way to imagine this is to place the tip of the DiscoX at the center of an imaginary cube:
Take 6 sets aimed at the middle of each cube face (up, down, and four roughly horizontal directions at 90° to each other).
Take 8 sets aimed at the 8 corners of the cube.
Each set of 4 readings should be from the same tip-to-point measurement, but the exact location of the 14 fixed points is flexible and the alignment doesn’t matter too much. Just that there is a wide range of positions and the DiscoX is held steady, using a jig makes it easier.
After all 56 readings, the DiscoX calculates the ellipsoid calibration coverage, smaller numbers are better.
Alignment calibration
Take 3 sets of 8 readings.
Each set is measured from the pointed tip at the back of the DiscoX to a single fixed point.
The fixed points for each set should be roughly 90° apart. For example:
Set 1: ahead
Set 2: to the right
Set 3: vertically up
For each of the 8 readings in a set, barrel-roll the DiscoX (rotate it along its long axis) by roughly 45° between readings.
Important: All 8 readings in a set must be measured between the same tip-to-point line.
Calibration Accuracy:
The standard deviation of angular error indicates quality:
- Excellent: < 0.25
- Acceptable: < 0.5 Lower values are better.